![[MV/MZ] Xai's GPT Plugins](https://img.itch.zone/aW1nLzE4MDExODcwLnBuZw==/original/%2FDjcZA.png)
[MV/MZ] Xai's GPT Plugins
A downloadable tool
RPGMaker plugins, made with GPT.
- Note, these were originally created for Hallohill, but as I do not want to put AI in the game I have taken the liberties of remaking what I need by hand. Kinda ironic huh? Lol. You will still see the features of some of these plugins in it, such as babylon, but consider these plugins unmaintained..
Created for use in my game Hallohill, but anyone can use and do with them whatever you please (ofc, I didn't code them myself after all). You will find notes, and a few QOL changes to them that make things clearer. I want to show the true potential of RPGMaker if the engine was expanded on. It can do many things when pushed to the limit. Some of these features exist in other plugins but those are either overpriced, buggy, or not easily accessible, in my opinion. So, I took to AI.
Features include GLSL Shaders, Babylon 3D, CSS functions such as Shapes, Videos, Textboxes, and more.
Disclaimer.
I would highly recommend pointing out that your game uses AI plugins, lest to upset people. This page is called "Xai's GPT Plugins" just for ease of search. Do not credit me unless you feel it, all I did was press buttons. My game is free and on itch, but using these for a paid game and putting it on steam is something you yourself will have to look into.
✨Now, the plugins.✨
These were made for MV. MZ is not tested, but should work. If not then it should in the near future. All plugins are game ready (expect 1) but I will be updating and creating new ones as needed for me. Improved screenshots will be added. If you want to see a game using these plugins in action, check out Hallohill when the demo comes out or on release. Below are all the plugins and their purpose, keep the hierarchy when sorting them to your plugin manager.
Enough talk. Enjoy:
- StartNewGameAndTransfer
Starts a new game and takes the player directly to another map based on a script command and xy location. Good for using with canvas to skip the base title screen and go to a map. Works with Hime's PreTitle plugin, so it won't skip the pretitle room.
- SetPartyOrder:
Script command to easily change the party order. Who's in front, who's second... etc.
- SetCursorImage:
Plugin command to change the mouse cursor to an image in a folder. Can break if you alt tab.
- GetScreenSize:
Plugin command to get the player's screen size (game resolution) and put them in variables. Crucial for the next plugin, and others.
- ShowVideo:
Script command to display and erase videos on screen. These videos go above everything, include CSSCanvas. You can control various properties like scale, opacity, mute volume, filters, and more.
- MoveVideo:
Works with ShowVideo plugin. Adds a script to move those videos, with the ability to change some properties. AKA animate, based on a frame amount for the length of the movement.
- TextBox:
Creates text on the screen with a script command.
- MoveTextBox:
Same as MoveVideo, but for Text.
- FontLoader:
Loads fonts specified from your font folder so you can use different fonts in all the plugins here that use text.
- SoundChannels:
Ever wanted more than BGM BGS ME and SE? Ok here's 10 more(0-9). Separate from normal RPGMaker sound channels. Script commands to play on all of them all separately, and kill the sound on any channel whenever.
⚠ WARNING! volume is load. Put the volume at '1' for 100.
- PreventHalt:
Gives an alert when the game encounters a javascript error (like TypeError for example), instead of completely halting the game. You can also remove the alert entirely in the script, although I wouldn't recommend that..
---------------------------------------------------------------------------------------------------
𝐂𝐒𝐒𝐂𝐚𝐧𝐯𝐚𝐬!
:D
A suite of plugins based on the idea of a 'canvas', a layer on top of RPGMaker's that interacts separately from the pixi.js (normal gameplay) layer. What can you do with canvas? Anything you can do with CSS and Javascript. (probably)
If you add an image using canvas it won't go away until you delete it with a script, reload the game, or delete the canvas 'layer' the image was placed on. The perk of canvas is the ease of making easily changeable menus, ui, and of course, 3D. I would say a basic understanding of JS and CSS would help, but is not required as it tells you what to do in the description.
Some of these plugins require css files or javascript CDN library files to be placed in specific folders to work or use certain features. Create a css folder in your game's directory for css files, and place the javascript CDN libraries in js\libs. "Where do I find the required libraries?" They are linked as they are mentioned, don't worry. There's an index.html CSS and JS reference at the bottom of this page if you don't know what to do.
- CSSCanvas
The base plugin required for everything else. Allows creating canvas layers that are used to place elements on all other canvas plugins. The higher number takes priority over the lower number. When a layer is deleted, so goes every element on it, with a few expectations.
- CSSCanvasShapes:
Place CSS shapes on a canvas layer. https://developer.mozilla.org/en-US/docs/Web/CSS/basic-shape
- CSSCanvasFilter:
Apply CSS filters to a canvas layer, thereby affecting all the elements(shapes, images, etc) on it. https://developer.mozilla.org/en-US/docs/Web/CSS/CSS_filter_effects CSSGram support for more filters. https://cdnjs.com/libraries/cssgram
See all the filters it has here: https://una.github.io/CSSgram/
Download cssgram.min.css (version 0.1.12 works) and place it in your css folder. Then, add it to your index.html file.
- CSSCanvasImages:
Place CSS images on a canvas layer. https://developer.mozilla.org/en-US/docs/Web/CSS/CSS_images
- CSSCanvasUltimateTextbox:
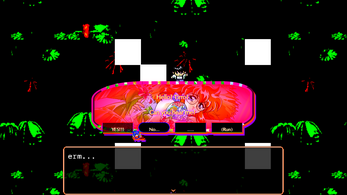
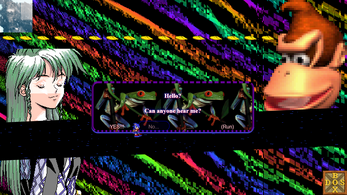
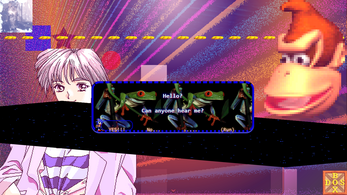
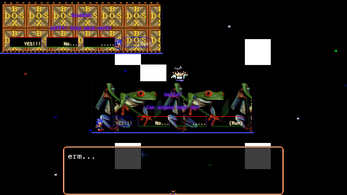
This one is BIG. A plugin that lets you place CSS textboxes on screen. It's better to just read the plugin description and try it out yourself. You can see the textbox in the screenshots. You can change the border style, width and height, text color, background... anything. I highly suggest looking at what can be added to it on Mozilla docs: https://developer.mozilla.org/en-US/docs/Web/CSS/border-style https://developer.mozilla.org/en-US/docs/Web/CSS/background
The textbox has htmx support to add more things to the text. This basically means animated dialog messages. https://cdnjs.com/libraries/htmx
See an example here: https://htmx.org/examples/animations/
Download htmx.min.js (version 2.0.2 works) and place it in your js\libs folder. Then, add it to your index.html file.
- CSSCanvasUltimateTextboxAnimation:
CSS Animation for Ultimate Textbox. https://developer.mozilla.org/en-US/docs/Web/CSS/CSS_animations
- CSSCanvasUltimateTextboxChoices:
It would be lackluster to only have textboxes with no interaction. This extension lets you add choices to a css textbox. Examples in the screenshot. Keyboard and Gamepad controls. Again, this is another expansive plugin where you're better off trying it out for yourself. It uses bttn.css to make the choices look better. https://cdnjs.com/libraries/bttn.css
See the types of button styles here: https://bttn.surge.sh
Download bttn.min.css (version 0.2.4 works) and place it in your css folder. Then, add it to your index.html file.
⚠ Currently an issue with branching.
- CSSCanvasUltimateTextboxAnime:
Apply anime.js animations to a css textbox. This is separate from the other textbox animation plugin, so they can be combined. https://cdnjs.com/libraries/animejs
See the animations and documentation here: https://animejs.com/
Download anime.min.js (version 3.2.2 works) and place it in your css folder. Then, add it to your index.html file.
- CSSCanvasNESTextbox&Choices:
Textboxes and choices for a separate css style, nes.css. https://cdnjs.com/libraries/nes.css Be warned, this is standalone from the ultimate textbox plugin and is discontinued. If you add nes.css anyway, you get a cool default cursor though :)
See the github site for examples: https://nostalgic-css.github.io/NES.css
Download nes.min.css (version 2.3.0 works) and place it in your css folder. Then, add it to your index.html file.
- CSSCanvasTransformations:
Allows for CSS Transforms on CSS Shapes and Images. https://developer.mozilla.org/en-US/docs/Web/CSS/CSS_transforms
- CSSCanvasAnimations:
CSS Animations and anime.js animations for CSS Shapes and Images. https://developer.mozilla.org/en-US/docs/Web/CSS/CSS_animations
Procedure for adding anime.js is the same as in UltimateTextboxAnime section above.
- CSSCanvasGLSLShader:
Adds a GLSL shader to a canvas layer. https://glslsandbox.com/
You can either learn how to make GLSL shaders or use premade ones on the site. Not all of them work, but most do. Important: Make sure to change the time and resolution to u_time and u_resolution. If you want to learn GLSL shaders from scratch, here is a good series:
- CSSCanvasVideo:
ShowVideo + MoveVideo, for CSSCanvas. (There's no module or property, but it works basically the same as ShowVideo and MoveVideo)
- CSSCanvasParallax:
Parallax scrolling
made easy for csscanvas.
- CSSCanvasBabylon:
(wip description)
Babylon JS 3D framework. Do 3D things. https://cdn.babylonjs.com/babylon.js
Working on an explanation for gameplay with Hallohill as an example.
See the official site: https://babylonjs.com/
Download babylon.js from the link and place it in your css folder. Then, add it to your index.html file.
- CSSCanvasShaker:
⚠ Experimental! Based on Creta Park's Shaker plugin.
Applies a shake effect to everything on a canvas layer. Like the normal rpgmaker shake... but for csscanvas. Currently half-broken since after the first shake, images are no longer effected. Game has to be reset for images to shake again. Not to mention it's somewhat laggy and getting the shake fast or strong enough is not balanced yet. Use at your own risk.
- CSSCanvasCursor:
Like the other cursor plugin, but for css canvas. There is also a cool afterimage effect I thought would be neat :D
---------------------------------------------------------------------------------------------------
Remember to double check your code. Sometimes you type a number wrong, and it feels like the whole plugin broke, but that is not the case. Some things that might trip you up:
- Some of the canvas plugins have an "IMAGE_ID, Z_INDEX" format, while others have a "Z_INDEX, IMAGE_ID" format. GPT hallucinated along the way and did this... ¯\_(ツ)_/¯
- If you haven't created a canvas layer and try to place something on it, nothing will happen. Might seem obvious but that got me a few times.
- When dealing with scripts, they get long. RPGMaker's script box cuts off after 12 lines, but there's an easy way to get around this. If you type your code out in a separate editor then add enough comment slashes at the bottom, you can copy and paste it into the MV/MZ scriptbox and it won't cut off your code. Allowing you to make it as long as you need. Paste this below your code in a code editor, then copy all of it and paste it into rpgmaker:
//////////////////////////////////////////////////////////////////////////////////////////////////////////////////////////////////////////////////////////////////////////////////////////////////////////////////////////////////////////////////////////////////////////////////////////////////////////////////////////////////////////////////////////////////////////////////////////////////
- Putting too many parallaxes on screen, making textbox animations with 10 moving parts that are going super fast, you add more than 2 GLSL shaders and bam. You've got 10 fps and haven't even loaded up Babylon 3D yet. Use what you must, and delete what you aren't using anymore. Hold yourself to limitations so that things don't become a slideshow.
And finally, make a good game.
Hardest part for sure :3
🏥-=-Help Section-=-🩺
Open your game's index.html file in a code editor of your choosing. It's in the same folder where img and audio folders are. Now below is the code you must place in it for those libraries to work properly. The last line of code for each reference is what is ALREADY there in the base html. Copy and paste the code above it, and place it in the file so that it resembles the reference. This is all assuming you downloaded every plugin, and put the css and js files in the correct spots.
CSS reference:
<link rel="stylesheet" href="css/nes.min.css">
<link rel="stylesheet" href="css/bttn.min.css">
<link rel="stylesheet" href="css/cssgram.min.css">
<link rel="stylesheet" type="text/css" href="fonts/gamefont.css">
JS reference:
<script type="text/javascript" src="js/libs/babylon.js"></script>
<script type="text/javascript" src="js/libs/anime.min.js"></script>
<script type="text/javascript" src="js/libs/htmx.min.js"></script>
<script type="text/javascript" src="js/libs/fpsmeter.js"></script>
| Updated | 1 day ago |
| Status | Released |
| Category | Tool |
| Author | Xai |
| Tags | AI Generated, javascript, plugins, RPG Maker, RPG Maker MV, RPG Maker MZ |
Download
Development log
- updated CSSCanvasBabylon44 days ago
- added PreventHalt66 days ago
- added csscanvascursor69 days ago
- css choices update72 days ago


Leave a comment
Log in with itch.io to leave a comment.